Showing posts with label DIY. Show all posts

Saturday, December 23, 2023

Great decor idea pencil and some artificial flowers

This was quite a nice surprise, to see that a restaurant has opted for pencil sets to create great looking decor. Some pencils, some artificial flowers/feathers, bright colors and you are done.

I realize that it might involve some elbow grease DYI. But a glue gun or some other kind of glue would help to do such decor in no time,it does look very good, simple and fresh.

It was a even nicer surprise as I ended up randomly at this restaurant after a great day road trip.
Very dramatic scene close to the mountains having their peaks covered with snow while the city is covered in fog and drama.

Tuesday, January 22, 2019

Fountain pen nib work, my story

There are a number of good videos from competent people that show you how to do that.
After watching and reading I did my own thing, of course. But we make mistakes and sometimes we learn from them.
First I did a little work on my Preppy. It was scratchy in one direction so I thought I should address it. Aligning the tongues on the nib was the first step. After very many tries I failed and gave up the strategy.
My second step was to "polish", more like grind the nib using ceramic. The back of a cup which was smooth enough for the task. I tried sandpaper 1200 but I only made it worse.
So back to the cup. After a lot of figures 8, circles in both direction and rocking the nib left to right, right to left, up and down, I came to an acceptable finish.
I also spread the tongues a little bit to make it wetter (this made it broader also). The last step was the polishing. I used a glass and done figure 8. The glass is smoother than the ceramic so it made it a little more paper friendly.
But after these experiments, I am pleased with the fountain pen. It does not scratch in any direction, it writes well with no feed problem, the ink keeps up with the nib regardless of speed or direction.
Of course, I did not stop here.
I had to tweak my other fountain pen the Faber Castell Loom.
There was a lot of voices in my head saying don't do it, for God sake DO NOT DO IT, but being the person I am I could not help myself.
I noticed a problem after I took it apart and reassemble it for the first time.
It wasn't writing as I remembered it. It was drier. If I was moving my hand quick to underline something or sign a paper the ink would not keep up with the nib.
I could not leave it like this knowing that is something wrong with it and the pen could write a lot better.
At a later time, I figured it out, how I managed to ruin the nice feel of it. The nib was not set properly from the factory and it had a slight wobble. Being my first serious pen I did not know I could just push it inside a bit more and I was constantly realigning the nib to the feed by pressing the tip of the nib to the paper I was using. This made the tongues to get closer and closer at the tip. I did this so I would not get ink on my fingers.
Anyway...

So I tried to make it wetter. I applied light pressure on the nib to spread it apart. But it didn't work very well. I fell the nib after a short time just takes its initial form. So I brought out the big guns.
The first problem, I do not have a magnifier glass
The second problem, I do not have a brass shim

But where is a way there is a solution.
First I took the nib out of the fountain pen and used the bathroom fluorescent light to see if the spread between the tongues is consistent. It shows very well, just put the nib in front of the light.
It has to be a fluorescent because is a source of light that does not blind you.
The tip of the nib was really close. So without a shim, I improvised. I picked up an old style razor blade and used it as a shim.
One important note. Be gentle! when prying the nib, I put a little too much pressure and I slightly bent one of the tongues (very slightly) to the left. Because of this, the nib would scratch a little bit as it grabbed the paper. To fix this I used something I do not recommend. Cover your eyes and ears, I used a plier and extra light touches as I couldn't straighten it by hand.
To check how I need to align it I did vertical up-down lines and horizontal left to right and vice versa, and finally a 45 degree angle. This way you can determine if one of the tongues is misaligned. Another method to check it out is using the camera on the phone plus a flashlight as you need a lot of light to focus well and see any imperfections, or just buy a cheap magnifier. I did finally buy a magnifier but after I went through all the trouble. It is much more fun this way.
Because the Faber Castell Loom has such a great nib I did not try polishing it in any way. I just checked the alignment after I made it wetter.
I am happy the pen writes very well now, and the feel of it in the hand is great. Also, I am glad I did not ruin it.

And before you get into nib work, make sure you have cleaned it. Also, consider that the nib will feel different on different papers and when using different inks. Some inks are more fluid than others.
Plus, never use Pelikan 4001 Brilliant Red, there is nothing brilliant about that :)

Friday, February 24, 2017

DIY Party game Telestration

DYI telestration fun drawing party game


This is the best and most fun game you can play, and you have to try it now. Why? Because it's hilarious, fast-paced, everyone in the group is involved, and in the end there are no losers. Everyone wins because everyone will have a great time.

If you are interested in trying Telestration yourself but you do not have the game, don't worry. Just follow the suggestions in this short guide of how to make and play DIY Telestration.

What is Telestration?
It is a game that is a combination between telephone and illustration, so the name Telestration.
You draw, guess, draw guess and at the end of the round, you will find that laughing can be painful. The game is fun for everyone. Children and adults alike will enjoy playing it. You can play with the family during game nights and holidays or with friends.


How to play Telestration without the game?
Here is a list of things needed to create your own game, in case you don't own it.
First step is to get a bunch of cards on which to write words that you will have to draw. Abstract things can be fun as well, as most likely it will lead to funny and unpredictable art later in the game. Also, you want to have a fair number of cards, so you do not draw the same card over and over again.
A good starting point is Cards Against Humanity (white cards). If you do not have this game either, you can print the cards from the internet. Just do a Google search, and you will find free to print PDFs. Then just print them on standard paper and cut them at the appropriate size. Of course, you can add your own cards in or create your own personalized set of cards.
If you want to be fancy, you can print on cardboard 200-250 grams paper. Usually standard laser printers won't be able to print on this thickness, so your best bet is an ink jet printer which usually can do this type of job.

The second thing needed is paper to draw on, a notebook would be great. One notebook for every person playing the game. If you enjoy it and want to play over and over again, I suggest buying a whiteboard foil and making notebooks out of it. You will draw with whiteboard markers on it, and you will be able after the round ends to erase the notebooks and reuse them for another round. The cost of the whiteboard foil, markers, notebook on which to stick the foil, cutter, and other small things will be around $30 for 10 notebooks. At least this was the price I paid, your mileage might vary.
 

The third thing, you will need something to draw with. Pencil, pen if you draw on normal paper is just fine and white board markers if you opt to make a reusable set of notebooks.

How do you play Telestration?
The more, the merrier. The game starts with a drawing round. Everyone starts with a notebook and draws a card from the pack without showing it to anybody else. This is the only time you will draw a card, right at the beginning of a round.

You start a timer for 1 minute, it can be a phone placed in the middle of the table, and then everyone has to draw what is written on the card, without using letters or numbers that would give a clue to the next person what it represents.

Once the timer runs up, everyone will put their name on the drawing and pass it to the left, or right, it doesn't make a difference. The notebooks will travel in a circle, reaching each player. Just keep the same direction for the entire game. 

Let's pass the notebooks to the left for this imaginary game. The player on your left, that receives the notebook from you, will see your drawing and only that. After looking at the drawing, he/she will flip the page and will write what the drawing represents. At the same time, you will receive a notebook from your right and will do the same thing, using the 1-minute timer for each of these rounds of drawing or guessing.

Then the notebooks are passed once more for a drawing round. The next player in line will only see the thing the previous person wrote, not the initial drawing, and will have to make a drawing based on the previous person guess. 

The notebooks are passed after each drawing or guessing rounds, each time the players will see only what the player before them wrote or drew, and each of these rounds will be timed, 1 minute. You will keep guessing and drawing until finally the notebook you started with will end up in your possession again.

Once you have your starting notebook, the game is over and each player tells the story of his notebook. Taking turns, players will reveal to the group the card they started with, and then they will flip through the pages, showing to everyone the evolution of the evolution of the guessing and drawing.
 

This is the real fun part of the game, laughing and making fun of the drawings and guesses.

There are no losers to the game, only winners because everyone will have a great time.


Resources:

Download link for cards against humanity: download
Whiteboard: double sided 9x12" (can be cut smaller) / with adhesive, A4 or large size (cut to size and stick it to a small notepad)
Makers: erasable makers for whiteboard
Eraser: whiteboard eraser


Related posts:
1. Secred Hitler board game DIY (a game that you can print at home and have a lot of fun, "mafia-style game")
2. Party games, cheap and fun (3 short and fun games, 2 can be played with a standard deck of cards, the third dice rolling game)

Monday, December 26, 2016

Party games, cheap and fun

Recently I have been interested in board games. I have posted a DIY very fun and addicting party deception game, Secret Hitler. But I wanted a shorter game, fun and on the cheap side or a DIY game.
I have found 3 great games, 2 of them are card games, Coup and Get bit. And the last of the 3 is a dice rolling game, Roll for it.
Of course, there are other great fun short card games, like Munchkin, Exploding kittens, Saboteur, and the list can go on.
But I was interested in finding a game that can be played with a standard deck of cards or do it yourself kind.

COUP

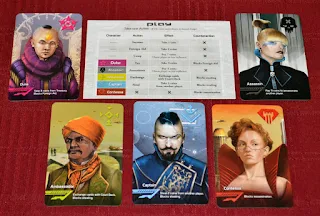
Coup is a poker like game with a lot of bluffing about the cards you have in your hands. The deck is composed of 15 cards 5 characters. Each character appears 3 times in the deck. I use an ace, jack, queen, king, and joker. Up to 6 players can play. If you would use a second deck, 10 12 players could play.
Each of the characters has an ability, but nothing stops you lying about what you hold in your hand.
The characters are
Assassin - Ace
Ambassador - Joker
Captain - Jack
Contessa - Queen
Duke - King

The characters have different abilities
The Assassin can assassinate a character
The Ambassador allows you to exchange the cards that you have in your hand
Capitan can steal 2 coins from another player
Duke can collect tax
The Ambassador and the Captain can block a steal
Contessa can block an assassinate
The Duke can block a foreign aid

Each player is dealt 2 cards, face down. Clockwise each player takes an action. If you get caught bluffing, get a card assassinated or are subject of a coup, you have to turn a card face up (the card is out of the game). When you lose both cards, you are out of the game. The winner is the player that still has a playing card. One more thing you need is coins. I use real ones as they are easy to find and cheaper than fake plastic ones :)
coup rules and actions
diy card game

GET BIT

Another fun game is Get Bit. The original game comes with a different color suit of cards, a plastic shark, and plastic robots that have detachable arms, legs and heads.
The concept is very simple. Each player puts a card face down on the table. The player that has the smallest number card is put last in line (closest to the shark) and the player with the highest number card gets to be the first in line. The players that are putting down the same number card do not move in line. The last robot in line gets bit by the shark and loses an arm or leg. When you have nothing more to lose you are out of the game. 
Because the traditional pack of cards does not come with a shark or robots, you will have to improvise.
Either get some Lego figures or use a pen and paper.

With a deck of cards, 4 players can play. If you have 2 different (non-similar) deck of cards up to 8 players would be able to play.
In a 5 player game, each one will receive 6 cards. (number of cards dealt is number of players + 1). If you do not have the figures you will deal an extra card to each player, for example, the king, which will be face up on the table, instead of the robots. You will use this card to establish which player is closest to the shark. 
When a robot is last and loses a part he will receive the previously played cards.
rules
diy card game

Roll for it

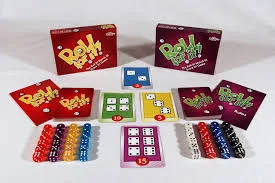
This is a simple dice game. Each player receives 6 dice. On the table are put 3 cards containing numbers that you have to roll. Each card has 2 up to 6 dices on it that have to be matched with the rolled numbers. When you have completed the card you take it and another card is put on the table. Each of the cards has a score. When you reach 40 points you win the game
rules

diy card game
Roll for it!

Get the feel of the games
To get a better feel of the games, you can look up some YouTube playing mechanics.
Or you can install the app. At least for Roll for it and Coup, the apps are free.


Remember, have fun!

Saturday, October 29, 2016

Secret Hitler board game DIY

Autumn colors and cold rain is perfect for arts and crafts, a DIY weekend project. Actually more like afternoon project.
I found an interesting board game named Secret Hitler. It is similar to Mafia, but in this, you get playing cards and a board.
secret hitler board game diy
The game is played with 5 up to 10 players. There are 2 teams, fascists, and liberals. The point of the game for the fascists is to get Hitler chancellor or promote 6 fascists laws. The liberals to win have to promote 5 liberal laws or kill Hitler.
So the first thing is to download the game from the kikstarter site. (download)
The pdf with the playing cards is b&w, and you do not get the full deck of cards design. All of the fascist cards are the same as well as the liberal cards. The real deal has beautiful artwork for every fascist and liberal card.
secret hitler board game diy printTo make the game I decided to get a thick paper, 300 gram (color cardboard). To print it I used my 10-year-old inkjet Canon printer. It needed a very slight nudge to take the thick paper in but after that, it was smooth sealing. I used color cardboard instead of plain white to give the game a bit of the original feel.
The total cost of the supplies was about 4 $, plus a few hours for printing and carefully cutting.
The colors I used for the cards are: yellow for the chancellor and president cards, blue-gray for the laws, role cards and party member card, and red for the board.

Monday, February 2, 2015

Taking apart a Citizen watch

In the previous post, I was writing about a Citizen automatic 21 Jewels day and date watch that I bought on eBay for 11.5 dollars. The watch came with a small problem, the second's hand is not staying in place. At the moment, because the watch was not winded enough, I thought it was keeping horrible time. I found out later it is running very well.
So the only reasonable thing to do was open the watch and see what can be done. The first obstacle was removing the crown and stem to take out the mechanism. For that I didn't need tools, just a steel sheet to open the back, and a Rotring Tikky to press the stem release button. (see previous post)
I put the second's hand but it does not want to stay, it's a two-hand watch now. But this was not all. The manual date/day change was a bit scratchy, so I thought it just needs a few twists to loosen it. I did the day/date change while the hands of the watch were not in the correct position. This caused another problem. The most serious one.
The day/date can't be changed manually anymore. I decided to take the Citizen watch apart, even though I didn't open a watch before.

Step one, buy a set of watch screwdrivers. 
I bought the cheapest set in the world. Under 2 €.
cheap

Thursday, July 10, 2014

DIY Phone and Tablet Stand

I have planned for a long time to build a phone stand. I feel it is very practical: at home or at the office.
Because I was postponing the build of the stand for some time I chose the path of paper. My first origami project. I was ambitious at first but the final result was ... not so good. It was simple to make, it holds the phone in place, it did as was advertised, but after less than a week with the origami stand on my desk, I abandoned the idea of holding the phone with an A4 sheet of paper. I just wanted something more cool and solid.
(If you are interested in an origami stand you can find good tutorials on google and youtube)
Finally, I found the time and willingness to do it.


Prototype #1 is out :
phone tablet stand diy metal


Even though is not perfect I consider it awesome. I just love the metallic feel and look.

Characteristics:
- stands on a desk, table, or flat surface
- it can hold a phone or a tablet in portrait or landscape mode, or two phones in portrait mode
- it keeps the phone at a good angle, which allows you to see the screen without having to raise the phone from the desk

Popular Posts